Tutorial singkat ini cocok sekali buat Anda yang sedang membuat jaringan komputer atau anda yang sedang belajar Jaringan Komputer. OK tanpa panjang lebar kita mulai membahas.
Apa sih kabel UTP itu? Kabel UTP itu adalah kabel khusus buat transmisi data. UTP singkatan dari “Unshielded Twisted Pair”. Disebut unshielded karena kurang tahan terhadap interferensi elektromagnetik. Dan disebut twisted pair karena di dalamnya terdapat pasangan kabel yang disusun spiral alias saling berlilitan.
Kabel UTP ada banyak merek yang beredar di pasaran, hanya saja yang terkenal bandel dan relatif murah adalah merek Belden - made in USA. Kalau mau yang lebih murah dan penggunaannya banyak, maka beli saja yang satu kotak, panjangnya sekitar 150 meter.
Konekktor
Konektor ini digunakan sebagai alat penghubung antara Kabel UTP dan LAN Card atau HUB/Swicth HUB/Router.
Konektornya ini bentuknya seperti colokan telepon hanya saja lebih besar. Nama untuk konektor ini adalah RJ-45.
Crimp Tool
Satu lagi yang sangat penting, Anda harus punya tang khusus buat memasang konektor ke kabel UTP, istilah kerennya adalah “crimp tool”. Alat ini gunanya untuk ‘mematikan’ atau ‘menanam’ konektor ke kabel UTP. Jadi sekali sudah di ‘tang’, maka sudah tidak bisa dicopot lagi konektornya.
LAN Tester
Dan untuk lebih memudahkan pengecekan Kabel UTP yang telah terpasang RJ 45 maka gunakan LAN Tester. Anda bisa membeli yang merek dari Taiwan saja agar lebih murah. Bentuknya seperti kotak dan ada lampu LED-nya delapan pasang dan bisa kedap-kedip.
OK sekarang peralatan udah siap, penulis mulai saja. Secara umum, pemasangan kabel UTP tersebut ada dua tipe, yaitu tipe straight dan tipe cross. Disebut tipe straight soalnya masing-masing kabel yang jumlahnya 8 itu berkorespondensi 1-1, langsung. Sedangkan disebut cross soalnya ada persilangan pada susunan kabelnya.
Bingung? OK! Untuk tipe straight itu digunakan untuk menyambungkan kabel dari client ke hub sedangkan untuk tipe cross adalah untuk client langsung terhubung ke client (cpu to cpu) atau juga dari hub ke hub.
Tipe Straight
Tipe ini adalah yang paling gampang dibuat. Kenapa? Soalnya langsung korespondensinya 1-1. Standar urutannya begini (dilihat dari lubang konektor, dari kiri ke kanan - lihat Gambar 4) : 2 oranye - 1 hijau - 2 biru - 1 hijau - 2 coklat . 2 oranye disini maksudnya pasangan oranye muda sama oranye tua dan seterusnya. Tapi tidak usah ikut standar pewarnaan itu juga sebenarnya tidak masalah. Yang penting urutan kabelnya. Misal ujung pertama urutan pin pertamanya oranye muda, maka ujung yang lain urutan pin pertamanya juga harus oranye muda, jadi antar ujung saling nyambung. Sebenarnya tidak semua pin tersebut digunakan.
Yang penting adalah pin nomor 1,2,3 dan 6. Jadi misal yang disambung hanya pin 1,2,3 dan 6 sedangkan pin yang lain tidak dipasang, tidak jadi masalah. Untuk lebih jelasnya silakan lihat gambar di bawah yang penulis foto dari sebuah buku.
Waktu akan memasangnya, maka potong ujung kabelnya, kemudian susun kabelnya trus diratakan dengan pisau potong yang ada pada crimp tool. Andak tidak perlu repot harus melepaskan isolasi pada bagian ujung kabel, karena waktu Anda memasukan kabel itu ke konektor lalu ditekan (pressed) dengan menggunakan crimp tool, sebenarnya saat itu pin yang ada di konektor menembus sampai ke dalam kabel. Perhatikan, agar penekannya (pressing) yang keras, soalnya kalau tidak keras kadang pin tersebut tidak tembus ke dalam isolasi kabelnya. Kalau sudah kemudian Anda test menggunakan LAN tester. Masukkan ujung ujung kabel ke alatnya, kemudian nyalakan, kalau lampu led yang pada LAN tester menyala semua, dari nomor 1 sampai 8 berarti Anda telah sukses. Kalau ada salah satu yang tidak menyala berarti kemungkinan pada pin nomor tersebut ada masalah. Cara paling mudah yaitu Anda tekan (press) lagi menggunakan tang. Kemungkinan pinnya belum tembus. Kalau sudah Anda tekan tetapi masih tidak nyambung, maka coba periksa korespondensinya antar pin udah 1-1 atau belum. Kalau ternyata sudah benar dan masih gagal, berarti memang Anda belum beruntung. Ulangi lagi sampai berhasil.
LAN TESTER - alat untuk memeriksa benar tidaknya sambungan kabel. Untuk tipe straight jika benar maka led 1 sampai 8 berkedip.
Berikut adalah gambar dari bawah dari ujung kabel UTP yang sudah dipasangi konektor dan berhasil dengan baik (urutan pewarnaan pinnya ikut standar):
Dan kalau yang ini tidak standar, coba perhatikan urutan warna pinnya, sangat tidak standar, tapi tetap saja bisa, yang penting korespondensinya satu satu (khusus tipe straight):
Tipe Cross
Untuk tipe cross itu digunakan untuk menyambungkan langsung antar dua PC, atau yang umumnya digunakan untuk menyambungkan antar hub. (misalnya karena colokan di hubnya kurang). Cara pemasangannya juga sebenarnya mudah, sama seperti tipe straight, pin yang digunakan juga sebenarnya hanya 4 pin saja, yaitu pin 1, 2, 3 dan 6. Yang berbeda adalah cara pasangnya. Kalau pada tipe cross, pin 1 disambungkan ke pin 3 ujung yang lain, pin 2 ke 6, pin 3 ke 1 dan pin 6 ke 2. Praktisnya begini, pada ujung pertama Anda bisa susun pinnya sesuai standar untuk yang tipe “straight”, sementara itu di ujung yang lain Anda susun pinnya sesuai standar buat tipe “cross”.Masih bingung? Begini cara mudahnya:Ujung pertama:
1. oranye muda 2. oranye tua 3. hijau muda 4. biru muda 5. biru tua 6. hijau tua 7. coklat muda 8. coklat tua
Maka di ujung yang lain harus dibuat begini: 1. hijau muda 2. hijau tua 3. orange muda 4. biru muda 5. biru tua 6. orange tua 7. coklat muda 8. coklat tua
Sudah agak lebih mengerti? Jadi disini posisi nomor 1, 2, 3 dan 6 yang ditukar. Nanti jika dites menggunakan LAN tester, maka nantinya led 1, 2, 3 dan 6 akan saling bertukar. Kalau tipe straight menyalanya urutan, sedangkan tipe cross ada yang lompat-lompat. Tapi yang pasti harus menyalasemua setiap led dari nomor 1 sampai 8.OK, selamat membangun jaringan komputer. Semoga Anda bisa berhasil sewaktu memasang konektor pada kabelnya. Semoga ilmu ini berguna buat Anda, soalnya waktu dulu penulis pertama kali membuat jaringan hasilnya lucu sekali, untuk mengupas kabelnya penulis masih menggunakan cutter, padahal sudah ada fasilitasnya di crimp toolnya. Tambah lagi ujung-ujungnya tiap kabel penulis kelupas lagi menggunakan cutter, padahal yang betul tidak perlu dikupas satu-satu, biarkan saja rata, karena nantinya apabila di ‘crimp tool’ maka pin tersebut masing-masing akan tembus ke dalam kabelnya. Semoga Anda tidak melakukan hal sama seperti penulis dulu.Demikian tulisan mengenai cara membuat sambungan kabel UTP untuk jaringan komputer. Semoga berguna bagi Anda semua. Terima kasih.
Pada contoh berikut, Anda dapat mengetahui bagaimana caranya mengambil data dari database dan menampilkannya ke control ListView. Data juga dapat diurutkan berdasarkan kolom tertentu dengan mengklik header ListView yang bertalian.
Code::
'Deskripsi: Menampilkan data dari database MS Access ke
'dalam control ListView dan memungkinkan untuk
'penyortiran data pada setiap field atau kolom di
'ListView jika header ybt diklik. Menggunakan
'reference "Microsoft ActiveX Data Objects 2.0
'Library" untuk coding database, dan control
'"Microsoft Windows Common Control 6.0"
'untuk control ListView.
'Pembuat: Masino Sinaga (admin@masinosinaga.com)
'Diupload : Senin, 22 Juli 2002
'Persiapan: 1. Buat 1 Project baru dengan 1 Form.
'2. Tambahkan reference dan component sesuai dengan
'yang disebutkan di atas.
'3. Tambahkan satu ListView ke dalam form, beri nama
'ListView ini dengan LV.
'4. Copy-kan coding berikut ke dalam editor form ybt.
Mungkin di antara Anda punya masalah khusus untuk manajemen file dan folder. Terutama bagi kalangan pengusaha rental komputer, dimana tidak luput dengan banyaknya file pengguna yang membanjiri isi hardisk komputer rental Anda. Cara lama yang sering dilakukan adalah dengan memanfaatkan fitur Windows "File Search" untuk mencari dan menemukan file-file pengguna yang tidak digunakan lagi untuk di hapus.
Tapi tahukah Anda, dengan pemrograman seperti Visual Basic, Anda dapat membuatnya menjadi otomatis dan lebih cepat bila Anda mau mengembangkannya. Untuk itu, saya akan memberikan satu contoh code untuk menampilkan isi direktori/drive sederhana.
Code::
'Judul: Memunculkan file atau sub direktori pada direktori yang ditentukan
'Coder: Tongam Tampubolon (Tomero)
'Penjelasan : Buat 1 Listbox, 1 CommandButton, Masukkan kode tsb dalam Form1
Private Sub Command1_Click()
Call ProsesLokasi(List1, "E:\", "mp3", True)
MsgBox "Selesai"
End Sub
'Prosedur memunculkan lokasi file/folder pada kontrol listbox
'ListTampil => Kontrol ListBox Target
'Lokasi => Alamat Drive/Direktori awal permulaan pencarian
'SaringExtension => Penentuan file yg ditmunculkan dalam ListBox
'Rekursif => Penentuan pemrosesan subdirektori
Private Sub ProsesLokasi(ListTampil As ListBox, Lokasi As String, _
Database merupakan media dimana suatu informasi disimpan,seperti sebuah filling kabinet yang menyimpan arsip-arsip surat pada suatu perusahaan. Ada dua type database utama, yaitu Flat-File dan Database Relational. Database yang Flat-File menyimpan data secara single dalam dengan ukuran byte tertentu dan akan bertambah terus, karena sifatnya yang single dan memungkinkan proses penambahan file membutuhkan updating data yang terus menerus maka database yang Flat File ini dikatakan kurang efisien untuk saat ini.
DATABASE RELATIONAL
Database relational terdiri dari satu atau lebih tabel yang tabel-tabel itu sendiri terdiri dari kolom-kolom dan baris-baris, seperti sebuah spreadsheet. Kolom-kolom pada tabel itu sendiri terdiri dari bagian-bagian yang mencerminkan tabel tersebut, bagian-bagian tersebut di sebut sebagai field., sedangkan kumpulan data-data yang tercantum dalam kolom-kolom tersebut akan membentuk sebuah record. Didalam sebuah database relational akan terdapat satu atau lebih field yang akan menjadi kunci utama untuk tabel itu, kunci utama itu biasa disebut sebagai Key, key itu sendiri bisa berupa Primaryatau Foreign Key.(lebih jelasnya di Mata Kuliah Sistem Basis Data)
Database Relasional mencantumkan aturan-aturan dalam menyimpan data kedalam tabel, yaitu tidak dimungkinkan adanya sebuah data atau Key yang sama yang nantinya akan menyebabkan timbulnya duplicate data untuk sebuah record, selain itu replicate(berulang) data juga sangat dihindari. Tabel-tabel yang terbentuk yang terdiri dari key-key yang ada dapat saling berhubungan dengan membentuk sebuah relationship atau hubungan antar tabel, sehingga keterkaitan antar tabel dapat terlihat.
Database relational sebenarnya dibuat untuk menghindari penyimpangan-penyimpangan dalam aturan-aturan menyimpan data ke dalam sebuah database.
PENGANTAR Ke SOFTWARE DATABASE
Software-software atau aplikasi yang dapat digunakan untuk mendesain sebuah database saat ini banyak sekali, baik yang bersifat Open-Source maupun yang Close-Source. Semuanya itu dibuat untuk memudahkan dalam mendesain database sebagai media penyimpanan data. Contoh-contoh aplikasi–aplikasi database yang digunakan untuk database desktop maupun untuk database client/Server atau Web base tersebut adalah :
- DBASE III Plus
- Microsoft Acces
- Paradox
- SQL SERVER
- MySQL
- ORACLE
- PostgreSQL
- ADABAS
Gambar 1 menampilkan gambar software database menggunakan Microsoft acces 2000. Database Microsoft Acces 2000 ini akan digunakan sebagai database desktop dalam perkuliahan Kita saat ini, serta programnya menggunakan Microsoft Visual Basic 6.0
Gambar 1. Database dengan Microsoft Access 2000
Dalam database terdapat juga field-field dan juga kunci primernya untuk setiap table yang ada. Jangan lupa mentertakan Type data apa yang akan Kita gunakan disesuaikan dengan nama field yang ada.
Gambar 2. Tabel Authors dengan field-field dan Type datanya.
Dalam satu database terkadang bisa terdapat lebih dari satu table yang akan digunakan, tabel-tabel tersebut akan berhubungan lewat suatu hubungan yang disebut dengan relationship.
Relationship itu dapat dibangun dari software database itu sendiri ataupun lewat kode program.
Contoh relationship terlihat pada gambar 3 dibawah ini.
Gambar 3. Relationship antar Table
KONEKSI DATABASE Dengan VISUAL BASIC 6.0
Database yang telah ada baik menggunakan Access atau software database lainnya dapat dihubungkan ke program yang menggunakan Visual Baic dengan cara-cara sebagai berikut :
1.Koneksi Database menggunakan ODBC
Langkah-langkah yang dilakukan :
-Buka Data Source ODBC di Control Panel, sehingga akan mendapat tampilan seperti pada gambar 4.
Gambar 4. ODBC Control Tampilan
-Click Add , cari database driver yang akan digunakan misalkan Microsoft Acces driver, kemudian klik finish.
-Akan muncul dialog tampilan untuk pemilihan database yang akan digunakan, seperti terlihat pada Gambar 5.
Gambar 5. ODBC Microsoft Acces Setup
-Pilih Database yang akan digunakan click Select kemudian tulis di Data Source Name nya kata-kata yang mecerminkan database tersebut.
-Setelah selesai Klik OK.
KONEKSI ODBC Pada MICROSOFT VISUAL BASIC 6.0
Setelah koneksi database dengan menggunakan ODBC selesai dibuat, langkah selanjutnya dalah bagaimana menerapkan koneksi tersebut melalui Visual Basic. Langkah-langkah yang dapat dilakukan, yaitu :
-Pilih Project baru , VB Enterprise Edition Controlkemudian pilih Adodc control pada kumpulan toolbox Vb yang ada.
-Click kanan Adodc control, pilih ADODC properties, akan terlihat tampilan seperti pada gambar 6.
-Kemudian checklist Use ODBC Data Source Name, pilih nama koneksi ODBC yang telah dibuat sebelumnya, setelah itu klik Apply lalu OK.
Gambar 6. ADODC properties
-Pada bagian RecordSource pilih 2.adcmdTable pada bagian Command Type, sedangkan untuk bagian Table bisa dipilih table apa yang akan digunakan.
-Setelah itu hasil koneksinya bisa dicoba, letakkan Object DataGrid1 pada form yang ada, lalu pada property Datagrid tersebut, yaitu Data source pilih Adodc1,kemudian program tersebut bisa dijalankan dan terlihat seperti pada gambar 7.
Gambar 7. Tampilan Database dengan menggunakan ODBC Control
2.Koneksi Database dengan Connection String
Untuk koneksi database yang menggunakan Connection String, tidak perlu dilakukan pembuatan Data Source Name, tapi bisa dilakukan dengan cara :
-Letakkan ADODC Control pada Form kemudian klik ADODC properties sehingga akan mendapatkan tampilan seperti pada gambar 6.
-Kemudian pilih Use Connection String , pilih Build akan terlihat tampilan seperti pada gambar 8.
-Karena yang digunakan adalah Connection String maka yang dipilih adalah Microsoft Jet 4.0 OLE DB Provider,lalu klik next pilih Database yang akan di gunakan.
-Klik OK, lalu pada bagian RecordSource pilih 2-adcmdTable dan nama table yang digunakan.
-Terakhir bisa dicoba apakah hasil Conecction String tersebut sukses atau tidak dengan menggunakan object DataGrid dan testing seperti ODBC tadi.
Gambar 8. Connection String Properties
LATIHAN.
Menggunakan Microsoft Acces 2000 bukalah file database Nwind.mdb yang mengelola database perusahaan rekanan NorthWind Trade. Klik menu Tools > Relationships untuk menampilkan jendela relasi antar table kemudian pelajari kunci yang dibuat dan relasi antar table. (Sumber Buku latihan Pemograman Database dengan Visual Basic 6.0 halaman 9 Drs. Ario Suryo Kusumo)
Buatlah Database dengan menggunakan Microsoft Acces 2000, kemudian lakukanlah koneksi terhadap database tersebut dengan menggunakan ODBC dan Connection String.
Coba lakukan koneksi database dengan menggunakan Connection string, kemudian Provider yang dipilih adalah Microsoft Jet 3.51 OLE DB Provider dan Microsoft OLE DB Provider for ODBC Driver
TUGAS
1.Tuliskan singkatan dan berikan penjelsan singkat tentang arti dari :
a.ODBC
b.OLE DB
c.ADO
d.DAO
e.RDO
f.SQL
2.Tuliskan langkah-langkah untuk membuat koneksi menggunakan ODBC dan Connection String menggunakan Visual Basic, beserta contoh dan hasilnya.
3.Buatlah rangkuman hasil saudara mempelajari soal latihan No 1 diatas.
4.Carilah dan tuliskan situs-situs tentang Visual Basic kemudian ambil satu artikel tentang Visual basic tersebut kemudian berikan resume singkat atau penjelasan singkat tentang artikel tersebut.
5.Pada Gambar 8. terlihat versi dari Jet OLE DB,yaitu Microsoft Jet 4.0 OLE DB Provider dan Microsoft Jet 3.51 OLE DB Provider, apa perbedaan dari kedua versi tersebut, bila perlu buktikan dengan software.
Source ini saya posting untuk menambah wawasan para programmer. Program ini digunakan untuk dial modem kemudian dalam beberapa detik koneksi modem diputus.
Program ini dapat dimodifikasi sesuai dengan selera yang akan menggunakan.
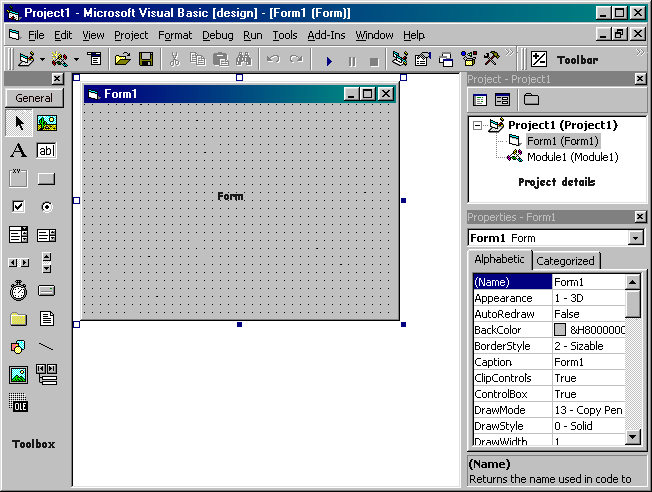
The above shows a typical opening screen for a Visual Basic project. The screen above shows the toolbox, which is used to design forms, a blank form, and the project details window. A Visual Basic project consists of a number of forms, modules and custom controls. Your initial screen may be different depending on which non-standard controls are loaded.
Forms are the main part of the project, used to design windows that serve as an interface to your program. Forms are used to display such things as labels, instructions, graphics and controls as well as allowing data entry for your program.
Controls are objects such as boxes, buttons, and labels that are drawn on a form to get data input or to display output.
The Toolbox displays all the standard Visual Basic controls plus any custom controls you may have added to your project.
You set the properties of forms and controls using the properties window. This changes values such as caption, name, font, colour, size and position.
The Visual Basic Toolbar provides shortcuts for commonly used operations.
Moving and Resizing :
Any object on a form and the form itself can be moved and resized using the mouse. To move a form, click on the title bar of the form, hold down the left mouse button and drag the form to its new position. To resize a form, similary drag the bottom right hand corner of the form using the mouse. (You can also drag the right hand side or bottom of the form for horizontal or vertical resizing.)
To move an object on a form, click on the object, hold down the left mouse button and drag the object to its new position. To resize, click on the object and drag any of the "handles" (black dots) with the mouse.
Task One :
1. Open a New Project (File Menu, New Project).
2. Click on the Label Icon in the Toolbox.
3. Move to the Form, hold down the left mouse button, drag to the right and down to produce a label box (see above).
4. Select the label.
5. Click on the Caption property (in the Properties window) and change the caption to 'Item'.
6. Repeat steps 2 to 4 to produce labels for 'Price', 'Quantity' and 'Total Price'.
7. Click on the Text Box icon in the Toolbox.
8. Move to the Form, hold down the left mouse button, drag to the right and down to produce a text box (see above).
9. Repeat steps 7 and 8 to produce three other text boxes.
10. Click on the Command Button icon in the Toolbox.
11. Move to the Form, hold down the left mouse button, drag to the right and down to produce a command button (see above).
12. In the properties window, click on the Caption property and change the caption to Calculate.
13. Repeat steps 10 to 12 to produce a command button with the caption 'Exit'.
14. Practice moving and resizing the form and its controls to allow ease of editing and to align the form and its controls.
15. Choose 'Start' from the 'Run' menu or click on the Start Program shortcut on the toolbar.
16. Move around the form using the mouse, TAB key and arrow keys. Type some information into the text boxes.
17. Chose 'End' from the 'Run' menu or click on the Stop Program shortcut on the toolbar.
18. Choose 'Save Project' form the File menu. You will be asked to give a name for the new form and the new project you've created. Call them both STOCK (STOCK.FRM and STOCK.VBP).
Congratiulations, you've written your first Visual Basic programme!!! At the moment, it contains no code, doesn't actually do anything with the data eneterd and the buttons don't work, but we'll change that later
Excercise One:
Open new projects for each of the following forms, create the objects shown and save with the names given.
Form name:
ADDRESS.FRM
Project name:
ADDRESS.VBP
Form name:
QUIZ.FRM
Project name:
QUIZ.VBP
Programming in Visual Basic
Properties and Names:
We had a quick look at properties in Unit One when we set up the Caption property for the labels and command buttons. An important part of the design of a Visual Basic project is to ensure that the forms displayed for the user are well labelled and provide straightforward and validated data entry. For the programmer, the use of meaningful names for controls makes coding easier to understand and debug. Trying to understand and alter something like
If x1 > y1 Then Text2 = "Too much" Else z2 = 2 End If
is almost impossible. What are x1, y1 and z2? What are we checking? Where is Text2 situated?
Properties:
For forms, labels and command buttons, the Caption property should always be set. The caption is the text that appears on a label or command button or at the top of a form.
For text boxes, the value that you want to appear as the form is loaded should always be set. In Unit One, we didn't do this and the default values of Text1, Text2, Text3 and Text4 were displayed. This is unsatisfactory for this application - the user would need to delete this text before meaningful values could be entered. Normally, we don't want to anything to be displayedin data entry boxes and would therefore clear the Text property. Occasionally, we would set a default value, for example, setting a VAT box to 17.5%.
Names:
For controlsthat we need to refer to during coding, the name property needs to be set. This enables us to write meaningful programs that are easy to follow and easy to change. There are a number of conventions used by programmers, but control names should always be descriptive and, if naming controls in Visual Basic consists of a standard prefix to describe the type of control, followed by whatever you want to call the object.
For example, in Unit One, we ended up with a form called Form1 (the Order Entry form), a text box called Text1 (the Data Entry box for the Item Name) and a command button called Command1. The following names would meet the standard Visual Basic naming convention:
Control
Control Prefix
Object Name
Complete Name
Form1
frm
Order
frmOrder
Text1
txt
Item
txtItem
Command1
cmd
Calculate
cmdCalculate
N.B. In Visual Basic, object names cannot contain spaces. Normally we use capitalisation for multiple words. For Example, if we wished to name the stock form "Stock Data Entry" we would use the name frmStockDataEntry.
Task 2:
1. Open the project created in Exercise One (File Menu, Open Project, stock.vbp)
2. Click somewhere on the form's background - not on any of the controls.
3. Click on the Caption property and change the caption to 'Order Entry'.
4. Click on the Name property and change the name to frmOrder N.B. Note the difference between Caption and Name. The caption is a label for the form to help the eventual user understand what this form does. We make this descriptive and spaces are allowed. The Name is the name used by tou, the programmer. It is still descriptive, but just enough to tell us the type of object and an indication of its purpose. No spaces are allowed.
5. Click on the text box Text1. In the properties window, click on the name property and change the name to txtItem. Click on the text property and delete the text 'Text1'. Similarly delete the existing text and change the name properties of Text2, Text3 and Text 4 to txtPrice, txtQuantity and txtTotalPrice respectively.
6. Change the name proerties of the two command buttons to cmdCalculate and cmdExit.
Click on the Save shortcut on the toolbar to save your changes (alternatively choose Save Project from the File menu)
Exercise Two :
1. Open th Project ADDRESS.VBP and make the following changes to its properties:
Default Name/Caption
New Caption
New Name
Notes
Form1
Address Entry
Text1
txtName
Delete existing text
Text2
txtAddress1
Delete existing text
Text3
txtAddress2
Delete existing text
Text4
txtTown
Delete existing text
Text5
txtPostCode
Delete existing text
Text6
txtPhone
Delete existing text
Exit
cmdExit
2. Open the Project QUIZ.VBP and make the following changes to its properties:
Default Name/Caption
New Caption
New Name
Notes
Form1
Quiz
frmQuiz
Text1
txtQuestion
Delete existing text
Text2
txtAnswer1
Delete existing text
Text3
txtAnswer2
Delete existing text
Text4
txtAnswer3
Delete existing text
Check1
chkAnswer1
Delete existing caption
Check2
chkAnswer2
Delete existing caption
Check3
chkAnswer3
Delete existing caption
Exit
cmdExit
Coding :
You've now finished setting up the properties and names for the controls on our form and we're now able to make it do something!!
We need to write code to instruct the Calculate command button to respond to a mouse click. The program should then look at the values entered into the Price and Quantity text boxes, multiply them together and put the answer in the Total Price text box.
You will write an event procedure called cmd_Calculate_Click. The name of this procedure consists of the object's name (cmdCalculate), the underscore character (_) and the type of event (Click).
Don't worry if this sounds complicated. Visual Basic will automatically create the procedure names for you!!
When is a Text box not a Text box?
All data entry in Visual Basic is treated as text, even if numbers are entered. Unlike older versions of Basic, Visual Basic will sometimes recognise that numbers have been entered and will allow them to be used in calculations. However, care needs to be taken when making assumptions about numbers entered into text boxes. At a later stage, we will make sure the user isn't allowed to enter letters by mistake in a text box that should contain a number, and that numbers are treated correctly by Visual Basic.
Task Three :
1. Double click on the command button named "cmdCalculate" (caption "Calculate"). The procedure name and End Sub is automatically entered:
Sub cmdCalculate_Click()
End Sub
2. Complete the event procedure by entering the calculation for Total Price:
Sub cmdCalculate_Click()
txtTotalPrice = txtPrice * txtQuantity
End Sub
This will take the value entered in the Price text box (txtPrice), multiply it (note the *) by the value entered in the Quantity text box (txtQuantity) and place the answer in the Total Price text box (txtTotalPrice).
3. Click on the Start Program shortcut on the toolbar.
4. Type in Headphones for the Item, enter 3.50 for the Price and 2 for the Quantity.
5. Click on the Calculate button and the answer 7 should appear in the Total Price text box. We'll worry about £ signs and decimal places later.
6. Try entering other values for Price and Quantity and calculating the Total Price.
7. Click on the Stop Program shortcut on the toolbar.
8. We need a better way of stopping the program, one that will be available as part of the form. Double Click on the button called "cmdExit" (Caption "Exit")
9. The programming command to stop the program is End. Enter this into the event procedure for cmdExit_Click:
Sub cmdExit_Click()
End
End Sub
10. Run the program again using the Start Program shortcut, try various calculations and then click the Exit button to finish.
11. Save your project.
Exercise Three :
1. Change the Caption of the Total Price label to Sub Total. Change the name of txtTotalPrice to txtSubTotal.
2. Create a new label with the caption 'VAT'. Create a new text box withe the name txtVAT and clear its text property.
3. Edit the cmdCaltulate_Click() event procedure to work out the sub total (txtSubTotal=txtPrice*txtQuantity) and an extra line to calculate the VAT (txtVAT=txtSubTotal * 17.5 / 100).
4. Create a new label and text box for 'Price Including VAT' and add an extra line to the cmdCalculate_Click() procedure to calculate a value for this new text box.
Save your work and run your program with various values
Programming in Visual Basic
Working with Text :
Text boxes, as the name implies, are designed to work directly with text. All text 'strings' involved within a program have to be enclosed within quotes. For example, to assign the value "Radio" to the Item text box within the Order Entry Form, we would use the following code:
txtItem = "Radio"
Task Four :
1. Load 'QUIZ.VBP' and add 4 command buttons with captions 'Question 1', 'Question 2', 'Question 3', 'Question 4' and names cmdQ1, cmdQ2, cmdQ3, cmdQ4.
2. Set the Multiline property of the txtQuestion text box to True. This will allow long questions to word wrap.
3. Double click on the Question 1 command button and enter the following code:
Sub cmdQ1_Click () txtQuestion = "What do you call a small piece of silicon which has a number of electronic circuits fabricated on it?" txtAnswer1 = "Byte" txtAnswer2 = "Chip" txtAnswer3 = "Port" End Sub
Click on the Start Program button, click on the command button to see the question being displayed. Click on the End Program button when you've finished.
Exercise Four :
1. Enter code for the Question 2, Question 3, Question 4 command buttons using the following:
Question 2
A keyboard is used to
Answers
Output data Input data Control input devices
Question 3
Which of the following is not an output device?
Answers
Light pen Plotter VDU
Question 4
The programs that run on a computer are known as
Answers
Hardware Liveware Software
2. Check that all questions and answers are displayed correctly.
Making Decisions :
You can include decision structures in any event procedure. A decision structure will test a condition and then perform operations depending on whether or not the condition is met or not (True or Flase). A condition usually makes a comparison between two values using one of the following operators:
Operator
Meaing
Examples
Explanation
=
Equal to
txtItem ="Radio"
is the item a Radio
<>
Not Equal to
txtPrice <> 0
is the price not 0
>
Greater than
txtPrice > 12.54
is the price greater than 12.54 £
<
Less than
txtPrice < 10.00
is the price less than 10.00 £
In Visual Basic, the If...Then...Else...End if structure is used to make decisions. The If, Then and End if parts of the structure are compulsory. The Else statement is only used when an alternative set of operationsneed to be carried out if the original condition is not met.
Examples :
To set the Price to £12.54 if the item is a radio:
If txtItem = "Radio" Then txtPrice = 12.54 End If
To set the address details if the name is P Brown:
If txtName = "P Brown" Then txtAddress1 = "EastBirminghamCollege" txtAddress2 = "Garretts Green Lane" txtTown = "Birmingham" txtPostCode = "B33 0TS" txtPhone = "743 4471" End If
To check if the user has chosen the correct check box for Question 1 in the quiz:
If chkAnswer2 = True Then Score = 1 Else Score = 0 End If
N.B. Notice the use of indents to line up the main parts of the stucture. This is used extensively in Visual Basic to make the program easier to follow and to make checking for the start and end of a particular structure easier.
Task Five :
1. Open the project STOCK.VBP. Add another command button with a caption of Find Item and a Name cmdFindItem.
2. Double click on this command button and add the following code:
Sub cmdFindItem_Click ()
If txtItem = "Radio" Then txtPrice = 12.54 End If If txtItem = "Headphones" Then txtPrice = 23.5 End If If txtItem = "Glasses" Then txtPrice = 13.99 End If If txtItem = "Teddy Bear" Then txtPrice = 23.49 End If
End Sub
3. Click on the Start Program button, enter a valid Item e.g. Radio and click on the Find Item command button to see the price being displayed. Try the program with other valid items (Headphones, Glasses or Teddy Bear). What happens if you enter an item that is not in the list? What happens if you type radio instead of Radio? What happens when you click on the Calculate command button? (We'll come back to this shortly)
4. Stop the program and re-save the project.
Exercise Five :
1. Open the ADDRESS.VBP project and add a Find Name command button (cmdFindName)
2. Add code for this button consisting of a number of If Then ... End If statements to check for the following names and the appropriate details from the table below:
Name
Address 1
Address 2
Town
Post Code
Phone
P Brown
E. Birmingham Coll.
Garretts Green Lane
Birmingham
B33 0TS
743 4471
J. Jones
1 New Street
Solihull West
Mids
B92 6TY
706 2234
B. Jaffer
33 Green Lane
Small Heath
Birmingham
B12 3ER
356 3434
C. Henry
243 Field Road
Sheldon
Birmingham
B26 4ER
742 2323
3. Open the STOCK.VBP project and add a new label, text box and command button as shown below:
Text box name
txtStockNumber
Command button name
cmdFindNumber
4. Enter code for this new command button to check the Stock Number and update the text boxes as below:
Stock Number
Item
Price
1000
Radio
12.54
1001
Headphones
23.50
1002
Glasses
13.99
1003
Teddy Bear
23.49
1004
Rocking Horse
45.98
1005
Dinner Set
24.99
Programming in Visual Basic
More Decisions :
The Select Case Structure
Quite often, as in the last unit, we need to test the same item a number of times for different values. When this is the case, we can replace all of the If ... Then ... Else statements that check that particular item with a Select Case structure. The general format is
Select case ITEMNAME Case First Possibility Statements Case Second Possibility Statements ... Case Final Posibility Statements Case Else Statements End Select
Each possible value of the item is checked using a Case statement and is followed by one or more Basic statements that will be carried out if there is a match for that value.
The final part of the structure is usually a Case Else statement which will come into operation if none of the other values match. This is useful for informing the user that he/she has made an error.
The Message Box
One Quick and easy way of displaying messages for the user is the message box. This brings up a standard Windows Dialogue Box, with appropriate buttons for the user to choose from. A message box is called from Visual Basic code using the MsgBox function using the following format:
MsgBox (message, type, title)
where message = text to be sdisplayed, type = buttons to be displayed, title = title that appears at the top of the box. The type and title sections are not compulsory - if thay are omitted, you will get a Dialogue Box with just an OK button and the title of the Form as the title of the Dialogue Box.
Task Six :
1. Open the project STOCK.VBP. Double click on the Find Item command button to bring back the previous code produces in Task Five.
2. Delete or edit the existing code to replace the If ... Then ... End If structures with the following Select Case structure:
Select Case txtItem Case "Radio" txtPrice = 12.54 Case "Headphones" txtPrice = 23.5 Case "Glasses" txtPrice = 13.99 Case "Teddy Bear" txtPrice = 23.49 Case Else Msgbox ("Your item has not been found") End Select
3. Start the program and try various correct and incorrect values for the item to check that your code is correct.
Exercise Six :
1. Modify the code for the Find Stock Number command button within the Stock project to use a Select Case structure instead of If ... Then ... Else statements.
2. Open the ADDRESS.VBP project and use the Select Case structure for the Find Name command button.
3. Add a new button to the Address project called cmdFindTelephone, with a Caption of Find Telephone Number. Write code code for this command button using the Select Case structure that will check a telephone number that is entered and automatically fill in the name & address details.
Using Else with an If statement
We saw in the previous tasks, the use of Else with the Select Case structure. The Else statement within an If ... Then ... End If structure performs a similar operation. This time, instead of checking a number of possibilities, we only check one condition and the Else statement comes in operation immediately if this condition is not met. The general format is:
If condtion statement(s) Then statement(s) Else statement(s) End If
For example, in the Stock project, we might want to check that a quantity is entered before carrying out calculations:
If Val(txtQuantity) = 0 Then MsgBox ("You have not entered a quantity") Else txtSubTotal = Val(txtPrice) * Val(txtQuantity) ... other calculations ... End If
N.B. val(txtQuantity) will also give a value of 0 if text is accidentally entered into the quantity box. The above code will therefore check for a zero quantity or text incorrectly entered.
Exercise Seven:
1. Open the Stock project and amend the code for the Calculate command button to check that a valid quantity has been entered as described above.
2. Amend the code for the Find Stock Number command button to ensure that text is not entered for the Stock Number. Remember that val(StockNumber) will give zero if text is entered. Also, in this case, the Select Case structure should be completely contained within the If ... Else ... End if structure:
If .......... Then ........ Else Select Case ........ ........ ........ End Select End If
Indentation :
Hopefully, you will have noticed that indentation is widely used in Visual Basic coding. Indentation is used to show the various parts of a structure - the statements that make up the structure are lined up. For example:
If ..... Then statement(s) Else statement(s) End If
Notice how the three components of the structure - If, Else and End If - are lined up and the statements that are linked to each part of the structure are indented. Similary, with the Select Case:
Select Case ... Case ... statement(s) Case ... statement(s) Case ... statement(s) Case ... statement(s) End Select
More indentation is needed for structures within structures:
Select Case ... Case ... If ... Then statement(s) Else statement(s) End If Case ... statement(s) End Select
The use of indentation makes coding much easier to read and change, particularly when the code becomes more and more complex with the extended use of various types of structure. It is very difficult, without the use of indentation, for instance to match End Ifs, End Selects, etc. to the appropriate opening statements, and this type of mismatch is a very common programming fault.
Comments :
It's easy to remember what a particular piece of simple code does immediately after you have written it. But what happens with very complex code that you wrotesix months ago that you have to change for some reason? Quite often, programmers write code and they can't remember what its purpose was. Similarly, they know why and what they've written, but can't find it!!
The use of comments within programs helps the original programmer and, more importantly, other people who have to read and/or amend the code, understand what particular sections of code do.
Remarks are used troughout the code as explanatory notes for the programmer. Thay do not effect the running of the code in any way. Each line of comments needs to start with Rem statement or a singe apostrophe ( ' ). For example:
Rem The following code checks the item entered into the Stock form Rem and enters the appropriate price into the form
Select Case txtItem Case "Radio" txtPrice = 12.54 Case "Headphones" txtPrice = 23.5 Case "Glasses" txtPrice = 13.99 Case "Teddy Bear" txtPrice = 23.49 'if the item is not found, display appropriate dialogue box 'with OK button only Case Else MsgBox ("Your item has not been found") End Select
Exercise Eight :
Re-visit all the code you have written so far. Check that indentation is used where appropriate and add comments throughout to describe your code.
Programming in Visual Basic
Sharing Data :
All the data we have used so far has been conveniently contained within controls on a form. This has meant that we can use the name of the control (txtQuantity, txtPrice, txtTotal, etc.) to refer to the data that is contained within those controls.
There are often times when we need to use variables data that is not contained in a control. Typical examples would be - to move data from one control to another, to move data from one form to another, as a temporary store during calculations and holding information for decision making.
To allow data to be shared between controls within a for, we declare the name of the data (and usually its data type) in the General Declarations section of the form's code. The general format of the declaration is
Dim data name as data type
For example:
Dim OldPrice As Integer
defines a new variable (data that can be changed troughout the program) called OldPrice that can only hold integer (whole number) values.
Dim Student As String
defines a new variable called Student that will hold text strings.
If you wish to define a constant item of data (one that holds the same value throughout) that is shared by controls within a form, we make a declaration using Const instead of Dim. For example:
Const VATRate = 17.5 defines a data item called VARRate which always has the value 17.5
Check Boxes :
Check Boxes only have two values 0 or 1, depending wether they are unchecked or checked. We can clear a check box by setting a-its value to 0 (e.g. chkAnswer1 = 0). We can also examine whether or not a check box has been checked or not. For Example:
If chkAnswer1 = 1 Then MsgBox ("Correct answer") Else MsgBox("Wrong answer") End If
Task Nine :
1. Open the Quiz project, re-arrange and add controls so that it is similar to the above.
2. Double click anywhere on the form, avoiding the form's controls to bring up the form's code. Choose (general) from the Object list at the top of the form's code and (declarations) from the Proc list. Enter:
Dim QuestionNumber As Integer
This sets up a variable to hold the number of the questions we choose which we will need to know when checking which answer has been chosen.
3. As each question is chosen, we need to ensure that the check boxes are cleared and that the QuestionNumber variable is set to the correct value. Edit the code for the Question 1 command button as follows:
chkAnswer1 = 0 chkAnswer2 = 0 chkAnswer3 = 0 QuestionNumber = 1 txtQuestion = "What do you call a small pice of silicon which has a number of electronic circuits fabricated on it?" txtAnswer1 = "byte" txtAnswer2 = "chip" txtAnswer3 = "port"
4. Edit the code for the Question 2, Question 3 and Question 4 command buttons similarly.
5. We need to write the code for the Check Answer command button. Generally, the message given to the user depends on the Question Number and which Check Box has been chosen. We can use a select Case structure for the question number and an If ... Else ... End If structure for checking the answer given. For question numbers 1 and 2 (Case 1, 2) the second answer (chkAnswer2) is correct, for Question 3 (Case 3) the first answer is correct (chkAnswer1) and for question 4 (Case 4) the third answer is correct (chkAnswer3). Doube click on the Check Answer command button and enter the following code
Select Case QuestionNumber Case 1,2 If chkAnswer2 = 1 Then MsgBox ("Well done, that is correct") Else MsgBox ("I'm afraid that is the wrong answer") End If
6. Enter the code for Case 3 and Case 4, the End Select statement and statements to clear the check boxes after the Select Case structure.
7. Save the project, start the program and test all options to see if your code works.
Exercise Nine :
1. Open the Stock project and add two check boxes labeled VAT and no VAT.
2. Edit the coding of the Calculate command button to see whether or not VAT is payable and carry out the appropriate calculation.
3. Open the Address project and add two check boxes labeled First Name and Surname.
4. Edit the coding for the Find Name command button to make it look for the first or last name of the person entered, dependent on the check boxes, and enter the relevant details. (Make up some first names of your own).
Programming in Visual Basic
String Functions :
A string is a set of characters treated as a single object. A string can inlude letters, numbers and special characters such as -,£,&,*,etc. The following are typical types of string:
A name
Freda Bloggs
A telephone number
0121-743-4471
A date
16-1-99
A time
22:05
A number
345
Anything you like
45$£%&ER(787***)
Everything entered in a text box is treated as a string and, as we saw in an earlier unit, numeric strings needed to be changed to values for use within calculations. The val function we use to do this is a typical example of a string function. Some of the other typical string functions are outlined below.
LCase or UCase :
The LCase statement will turn an entire string into lower case, UCase turns a string into upper case. For example:
txtItem
LCase(txtItem)
UCase(txtItem)
Radio
radio
RADIO
Disk 3.5
disk 3.5
DISK 3.5
By checking everything as upper case or lower case, we do not need to worry how the end user enters the information. For example, the first section of the Find Item code within the Stock project would change as follows:
Sub cmdFindItem_Click() If UCase(txtItem) = "RADIO" Then txtPrice = 12.54 End If End Sub
Left or Right :
The Left and Right functions are used to look at a set number of characters at the beginning or end of a string. The format is Left(String, Number of characters). For example:
txtItem
Left(txtItem, 5)
Right(txtItem, 3)
Radio Set
Radio
Set
Visual Basic
Visua
sic
Mid :
The Mid function return a certain number of characters from inside a string. The format is Mid(String, Starting Point, Number of Characters). For example:
txtItem
Mid(txtItem, 4, 5)
Mid(txtItem, 8, 1)
Radio Set
io Se
e
Visual Basic
ual B
B
InStr :
The Instr function tests to see whether on string occurs within another string. If the string occurs, the position of the start of the string is returned, otherwise 0 is returned. A start point for the search can be included, but is not compulsory. The format is InStr(Start Point, Large string, Small String). For example:
txtItem
Instr(1, txtItem, "Brown")
Instr(1, txtItem, "Smith")
Paul Brown
6
0
The Instr function is particulary useful for complex fields when the user may not give exactly what we expect. For example, suppose the user enters a full namewithin the Address project, we could use the following code as part of the Find Name code:
If Instr(txtName, "Brown") > 0 Then txtAddress1 = ......... ... ... ... End If
Mixing String Functions :
Quite often we mix string functions to ensure thorough checking. For example, we might need to force upper case for checking purposes and only look at a certain number of characters. Here are some examples:
If Right(UCase(txtItem), 5) = "RADIO" Then ... If InStr(1, UCase(txtName), "BROWN") > 0 Then ...
Format :
The format function is used to change the format of string, particularly those containing values. The general format is Format(String, format string). The format string is a set of characters that define how the string will be displayed. Typical format characters are
0
Display a digit ar a zero
#
Display a digit or nothing (if zero)
%
Multiply by 100 and add the % character
£
Insert a £ character
-() space
Display -,(,) or a space
For example:
String
Format String
Result
23.4567
"0000.00"
0023.46
23.4567
"####.##"
23.46
23.4567
"£0000.00"
£0023.46
23.4567
"£####.##"
£23.46
01217434471
(0000) 000 0000
(0121) 743 4471
Exercise Ten :
For all of the following, test that your code works before continuing.
1. Open the Stock project
2. Edit the coding of the Find Item command button and use the Ucase or LCase function to ensure correct matching.
3. Add the left function to only check the amount of characters that should have been entered i.e. for "Radio", check Left(txtItem, 5).
4. Add an extra button that will allow the user to search for part of a string (e.g. "Set" within "Dinner Set"). Copy the code from th Find Item button and paste into the code for the new button. Amend the code to use the InStr function.
5. Edit the code for the Calculate button to make use of the Format function to display the Sub Total, VAT and Total Price as currency.
6. Open the Address project.
7. Amend the code for the Find Name button to make use of the InStr function to find either the first name or last name.
8. Use the format function to display the telephone number as follows: 0121-7434471
9. Amend the code for the Find Telephone button to allow for the fact that the user may enter the number without the area code. (InStr or Right could be used).
10. The Len function ( Len(string) ) returns the number of characters in a string. Assume that a telephone number cannot have more than 12 characters. Add a test to the Find Telephone code to check that the user's number is not too big.
11. Find out about the Now function and Date formats from th help menu. Add a text box to all your forms that displays today's date in a suitable format
 OK tanpa panjang lebar kita mulai membahas.
 Konektor ini digunakan sebagai alat penghubung antara Kabel UTP dan LAN Card atau HUB/Swicth HUB/Router.
 Satu lagi yang sangat penting, Anda harus punya tang khusus buat memasang konektor ke kabel UTP, istilah kerennya adalah “crimp tool”. Alat ini gunanya untuk ‘mematikan’ atau ‘menanam’ konektor ke kabel UTP. Jadi sekali sudah di ‘tang’, maka sudah tidak bisa dicopot lagi konektornya.
 Dan untuk lebih memudahkan pengecekan Kabel UTP yang telah terpasang RJ 45 maka gunakan LAN Tester. Anda bisa membeli yang merek dari
  Bingung? OK! Untuk tipe straight itu digunakan untuk menyambungkan kabel dari client ke hub sedangkan untuk tipe cross adalah untuk client langsung terhubung ke client (cpu to cpu) atau juga dari hub ke hub.
 Tipe ini adalah yang paling gampang dibuat. Kenapa? Soalnya langsung korespondensinya 1-1. Standar urutannya begini (dilihat dari lubang konektor, dari kiri ke kanan - lihat Gambar 4) : 2 oranye - 1 hijau - 2 biru - 1 hijau - 2 coklat . 2 oranye disini maksudnya pasangan oranye muda sama oranye tua dan seterusnya. Tapi tidak usah ikut standar pewarnaan itu juga sebenarnya tidak masalah. Yang penting urutan kabelnya. Misal ujung pertama urutan pin pertamanya oranye muda, maka ujung yang lain urutan pin pertamanya juga harus oranye muda, jadi antar ujung saling nyambung. Sebenarnya tidak semua pin tersebut digunakan.
 Yang penting adalah pin nomor 1,2,3 dan 6. Jadi misal yang disambung hanya pin 1,2,3 dan 6 sedangkan pin yang lain tidak dipasang, tidak jadi masalah. Untuk lebih jelasnya silakan lihat gambar di bawah yang penulis foto dari sebuah buku.
 Waktu akan memasangnya, maka potong ujung kabelnya, kemudian susun kabelnya trus diratakan dengan pisau potong yang ada pada crimp tool. Andak tidak perlu repot harus melepaskan isolasi pada bagian ujung kabel, karena waktu Anda memasukan kabel itu ke konektor lalu ditekan (pressed) dengan menggunakan crimp tool, sebenarnya saat itu pin yang ada di konektor menembus sampai ke dalam kabel. Perhatikan, agar penekannya (pressing) yang keras, soalnya kalau tidak keras kadang pin tersebut tidak tembus ke dalam isolasi kabelnya. Kalau sudah kemudian Anda test menggunakan LAN tester. Masukkan ujung ujung kabel ke alatnya, kemudian nyalakan, kalau lampu led yang pada LAN tester menyala semua, dari nomor 1 sampai 8 berarti Anda telah sukses. Kalau ada salah satu yang tidak menyala berarti kemungkinan pada pin nomor tersebut ada masalah. Cara paling mudah yaitu Anda tekan (press) lagi menggunakan tang. Kemungkinan pinnya belum tembus. Kalau sudah Anda tekan tetapi masih tidak nyambung, maka coba periksa korespondensinya antar pin udah 1-1 atau belum. Kalau ternyata sudah benar dan masih gagal, berarti memang Anda belum beruntung. Ulangi lagi sampai berhasil.
 Untuk tipe cross itu digunakan untuk menyambungkan langsung antar dua PC, atau yang umumnya digunakan untuk menyambungkan antar hub. (misalnya karena colokan di hubnya kurang). Cara pemasangannya juga sebenarnya mudah, sama seperti tipe straight, pin yang digunakan juga sebenarnya hanya 4 pin saja, yaitu pin 1, 2, 3 dan 6. Yang berbeda adalah cara pasangnya. Kalau pada tipe cross, pin 1 disambungkan ke pin 3 ujung yang lain, pin 2 ke 6, pin 3 ke 1 dan pin 6 ke 2. Praktisnya begini, pada ujung pertama Anda bisa susun pinnya sesuai standar untuk yang tipe “straight”, sementara itu di ujung yang lain Anda susun pinnya sesuai standar buat tipe “cross”.Masih bingung? Begini cara mudahnya:Ujung pertama: